


It's time to get serious. We're saying "Shut Up!"
Too many trails are being closed and Counties are continuously trying to take away your right to ride on your own property, so District 23 has implemented sound testing at the moto cross events as has been done for several years prior at the off-road events. A 96 decibel maximum exhaust limit will be enforced as per AMA rules. Is the District being cruel? Are they picking on people that have aftermarket mufflers? Are they just trying to force everyone to ride stock muffled bikes? No, no, and no!
Less Sound = More Ground
Being active in keeping our riding areas open, we encounter many situations and opinions. Our club encounters a smattering of our riding friends who continue to ride with loud pipes. Emotional horsepower. Noise annoys. Period. Most of the 4-strokes nowadays have so much power, why would you want to go up another 10 decibels for a small amount of ponies? We are also around land owners, public and private. Many don't understand our sport, and we ALWAYS get hit with the noise issue. Most off-road events are on public lands where people use the lands in other various ways too. That's what they remember - the noise. Noise annoys, and I don't buy into the "loud pipes save lives" slogan, although that's primarily for the street.
Loud Pipes Risk Rights
Maybe you've noticed that your aftermarket pipe is sounding a bit ratty lately.
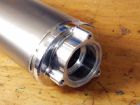 Did you know that most pipe manufacturers expect you to repack mufflers from time to time? Because these mufflers use fiberglass (or something similar) as packing material while stock systems employ solid steel (or titanium) baffles, they don't last forever like OEM pieces. In fact, even original mufflers will degrade over time, with the moisture from combustion eventually corroding the internals with broken baffles being the most common result.
Fortunately, changing the packing material is easy. Check with the muffler manufacturer as most offer repacking kits which include everything you need. In addition you'll need a drill and a riveting tool.
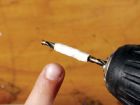 Remove the muffler from the bike and place it on a clean surface. Follow the directions for your muffler, but generally you will need to gain access to the packing by separating the muffler body from the end cap. Insert the drill bit (#30) into the drill and fit a drill stop if you have one. If you don't have a drill stop, wrap tape around the bit approximately 10 mm from the tip. This will prevent you from drilling too far into the muffler body.
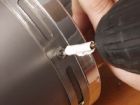 Carefully drill out the rivets. Usually, the rivet heads will pop off first, leaving a bit of the rivet body still in the hole, but don't worry about that. You can come back later and remove the rest of the rivet. If there's a retaining strap, remove it.
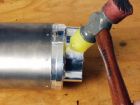 Sometimes the end caps are a tight fit into the muffler body, so some gentle persuasion with a plastic head hammer may be in order. Wearing gloves, gently pull the end cap from the muffler body.
  You don't want to get the fiberglass strands on your skin so be sure to wear gloves and maybe consider a long sleeve shirt. Remove the packing material and discard.
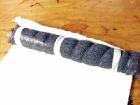 Tightly wrap the new mat around the core and test-fit the wrap in the muffler. Most kits come with more material than you can use, so don't be alarmed if there is excess. Secure the material with strips of masking tape. Yes, the tape will eventually burn off, but you really want the tape held tight to the core as you reassemble the muffler.
 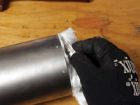 You may need to trim excess mat from the end of the muffler with a razor blade.
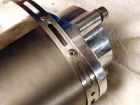
Before you reassemble the muffler, check the rivet holes in the sleeve and the end cap for burrs and cracks, and shake out the old bits of rivet. 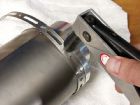 Insert the new rivets and pull them. Check to make sure the rivet head is flat with the surface. Wipe the outside of the muffler with mineral spirits to keep the oil from your hands from etching the metal and don't be concerned if the pipe smokes for the first few miles; that's normal.
 Now, doesn't that sound better?